A ramp for the shed which *should* be capable of supporting the industrial drill press that's currently in there.
Quick (stackable) sawhorses using these plans, currently minus the plywood caps.
Updates (and pictures) to follow.
Showing posts with label minor. Show all posts
Showing posts with label minor. Show all posts
Saturday, August 25, 2012


Tuesday, August 14, 2012
One thing led to another...
I built a dolly:


I did this because I need to clear and rearrange space in the living room, workroom, and attic to receive a bunch of (mostly) books from back east that have been sitting in a storage locker for several months longer than my father would like. This sudden flurry of boxing and moving boxes and furniture contemplation led to the following:
- Box up books in one corner of living room. Consider placing them temporarily where the desk is currently located.
- Realize the bookshelves that are also coming from NY would fit well where the desk is, and decide to place something else in that space, something that will be gone before the shelves arrive.
- Decide to take all the stuff I agreed to store for someone for the month of August and put it in the place where the desk resides currently. Plan to move other things to the foyer where the stored stuff is currently.
- Realize all this is contingent on moving the desk.
- Remove everything from the corner where the desk will go.
- Empty desk drawers, clean top, finally unplug and put away various electronic devices atop the desk that are no longer being used.
- Find that desk is too heavy to move by myself.
- Mutter 'I could do this if I had a dolly.'
- Decide to build a dolly.
- Get sidetracked for an hour sorting all the lumber I rescued from the theater festival strike by size, even though I only need four pieces of wood.
- Finally begin this fifteen minute construction project:
You'll need:
- 2x4s (I went with 2@18" and 2@25")
- four casters
- carpet padding or scrap carpet
- staple gun and staples
- 2.5" screws
- power drill and bit set
Cut your wood and lay it out, ensuring everything squares up. Fasten with at least two screws per intersection; predrilling recommended. Remember to keep the screws to the outer edges of the intersection to make sure you can place the caster in the center.

Cut the carpet padding to size (a little hanging over all edges is best - the point is to protect anything you're dollying) and staple directly to the top surface of the 2x4s. If you're using carpet, you will need heavier staples or possibly tacks.

Drill a hole dead center of each intersection. The casters I had are threaded, so I chose a bit a little narrower than their dimension, inserted a caster, hand screwed it one or two turns so it was firmly in the hole, then used an adjustable wrench to tighten them down. (These casters, conveniently, had an octagonal plate between the wheel and the stem.)


12. Use new dolly to move desk fifteen feet. Call it a day and plan to deal with the rest of the living room tomorrow.
Saturday, February 11, 2012
Tea shelves
Today on Well That Was... An Idea... a good idea to turn scrap wood into a useful kitchen organizer.
We'll be back after these commercials.
(That's your clue to click on all the banner ads on this site and make me millions.)
So I had a cabinet full of boxes and bags of tea. I also had a small gap between a door and a cabinet, and plenty of scrap wood just waiting to be project-ed.




The second problem is you'll want a peg that goes all the way through the cabinet wall and sinks into the board; much easier to achieve this with a screw or nail.
There's actually a third difficulty if you're going into artificial surfaces (like the heavy particleboard of these cabinets) - it'll be almost impossible to drill a hole of the exact right size so the peg can be tapped in yet won't slide out over time. Natural woods will be slightly more forgiving. Regardless of your woods, skip this approach and just use the screws.
We'll be back after these commercials.
(That's your clue to click on all the banner ads on this site and make me millions.)
So I had a cabinet full of boxes and bags of tea. I also had a small gap between a door and a cabinet, and plenty of scrap wood just waiting to be project-ed.

Top: Scrap wood. Bottom: Scrap wood, lovingly sanded.
Ten minutes with a random-orbit sander can take weathered wood and turn it into a paintable, or in this case stainable, surface that retains the scars and irregularities of the scrap.
I should do a full post about making black walnut stain (the gist is pretty straightforward - throw husks into water, boil for a while) but meanwhile, here's what one and then two coats on these pine boards looks like:


Installing was straightforward: sink a couple of 2" drywall screw from the other side of the cabinet into the board:


Voila. Now I can find things.
Worth noting: the straightforward install was not the original method. That method did not work as intended. Learn from my mistakes and do it right the first time.
The plan was to drill holes into both the back edge of each board and the face of the cabinet and use wooden pegs to connect the two. There are two main areas where this can go less than great. The first is lining up all the holes correctly. A drill press can simplify drilling the holes into the boards (it's not necessary - see my trick below), but you'll be going freehand into the cabinet.


The second problem is you'll want a peg that goes all the way through the cabinet wall and sinks into the board; much easier to achieve this with a screw or nail.
There's actually a third difficulty if you're going into artificial surfaces (like the heavy particleboard of these cabinets) - it'll be almost impossible to drill a hole of the exact right size so the peg can be tapped in yet won't slide out over time. Natural woods will be slightly more forgiving. Regardless of your woods, skip this approach and just use the screws.
Sunday, January 29, 2012
Oh look, there's a closet in here...
An upcoming trend on this blog (should I manage to get back into anything resembling a habit of posting regularly) will be the Virtues and Varieties of Shelving and Storage. I'm not a believer in having tons of stuff - if I ever rent a storage unit, please slap me. I am, though, a believer in having the stuff you do have simultaneously accessible and out of the way. Shelves, appropriately sized and positioned, are a great way to do just that. Duh.
This is why I don't write for the IKEA catalog. Anymore. Curse you, Lars...
Lets skip to the end for a moment. Here's what I built:

The closet in my foyer is a small triangle, the result of doorways being re-positioned in the 50's or earlier. Its size and shape make it so even a few items on the floor rapidly became a messy pile. It also presented an interesting planning challenge, namely figuring out the angle of the triangle's apex so the shelf could fit as cleanly as possible into the back.
There's probably a more technically-adept way of pursuing this, perhaps with calipers, or a degree in mathematics, but all my geometric scratchings just resulted in a worn pencil, so I went back to trial and error. I set the miter saw to what seemed like a good angle and made two cuts:

Then I trooped back and forth between the foyer and the workshop just fitting this one piece of wood into the back corner, and altering the angles needed until it fit 'squarely'. I think I hit an acceptable fit on the third try - for many reasons, this is not an instance where extra time spent getting it justsoperfect gets you much of an improvement in end-quality.
With the angle noted, it was an easy job to knock out several more cuts using a tape measure and a combination square.

Same thing for the second grouping of boards, just without switching the miter back and forth:

This project was done mostly with two-by scrap for durability (how careful are you with the things you toss into the front hall closet?), because I had it around, and it's easy to work with and forgiving (assuming you have an accurate enough saw). The rail is an easy cut since we already know the angle; I added a piece of scrap one-by to hold the stack together more cleanly.

The two-by rail could screw directly into the wall (if I knew where the studs were), but I went with a couple of simple legs made of two-by, and a 'fancier' leg cut from an old broomstick. Using a paddle bit, I set the leg about a half-inch into the shelf...

Then screwed in cleanly from the top:

Looks pretty, eh? This is why it's nice to have piles of miscellaneous (sorted) fasteners, so you can find the right size and finish for the job.
Now I only planned on three legs - two two-bys on the long edge, and what turned out to be the broomstick - to maximize access under the shelf. I debated about the placement of the broomstick leg, ultimately deciding on the 'front' placement because I expected any unbalanced loads to be towards the front. Maybe this will prove completely wrong; if so, expect a lengthy report on the matter. In all likelihood, it won't matter a lick - with the partial triangle shape, this is a stable design even though the leg isn't placed at the center (if it was placed further 'out', tipping would be quite possible).


Next week: more projects that take longer to post than to complete.
Monday, August 8, 2011
So much for that schedule...
...which, I think, may already be the title of a similar post.
Hang on, I'll check...
(flip, flip, flip)
(waiiiiit a minute, this isn't on paper...)
Anyway, I have done many, many things on the house since the last post. No, really, you must believe me. What exactly, I can't remember, because, you know - so many things! Yesterday I do remember. My friend Amanda wants to... learn about home repair? Is bored? Whatever the reason, she's been asking to come over and help me on projects in exchange for food and drink, which is exactly in my price range dontchaknow. While the initial intent was to tackle getting the gutters back up, there's still a bunch of pain in the neck prep work before we can even put the patches on the old holes, so I left that for the day.
Instead, we wound up rearranging a huge amount of stuff between the shed and the back room, freeing up tons of space, making tools accessible, and hitting upon the incredible conclusion that, of all the tools and materials that need to be in storage right now, that maybe that pile of plate glass panes that was in the shed could be what gets stored in the basement. You know, instead of anything wood or metal.
Geniuses, both of us.
Onwards!
Hang on, I'll check...
(flip, flip, flip)
(waiiiiit a minute, this isn't on paper...)
Anyway, I have done many, many things on the house since the last post. No, really, you must believe me. What exactly, I can't remember, because, you know - so many things! Yesterday I do remember. My friend Amanda wants to... learn about home repair? Is bored? Whatever the reason, she's been asking to come over and help me on projects in exchange for food and drink, which is exactly in my price range dontchaknow. While the initial intent was to tackle getting the gutters back up, there's still a bunch of pain in the neck prep work before we can even put the patches on the old holes, so I left that for the day.
Instead, we wound up rearranging a huge amount of stuff between the shed and the back room, freeing up tons of space, making tools accessible, and hitting upon the incredible conclusion that, of all the tools and materials that need to be in storage right now, that maybe that pile of plate glass panes that was in the shed could be what gets stored in the basement. You know, instead of anything wood or metal.
Geniuses, both of us.
Onwards!
Tuesday, July 5, 2011
Hey here's a good idea for homeowners
No really, it's one of those things that, if you haven't done it already, you'll smack your head when you read it:
Drill holes in the bottom of your garbage cans/recycling bins so rain can't collect in them.
That's it. I did this soon after moving into my house, although after one heavy rainstorm. It's one of those things that you won't notice the positive effects so much as you won't notice the negative ones. Yes. Sentence structure.
For those craving specifics: I think I used a 3/4 inch spade bit on the recycling bins (our town uses 3 gallon buckets for recyclables), one hole dead center; and a 3/8" or so bit several times on the bottom of the trash can. You shouldn't be impacting the structural integrity of the can if you drill 2-3 holes spaced out from each other and avoiding any seams.
Drill holes in the bottom of your garbage cans/recycling bins so rain can't collect in them.
That's it. I did this soon after moving into my house, although after one heavy rainstorm. It's one of those things that you won't notice the positive effects so much as you won't notice the negative ones. Yes. Sentence structure.
For those craving specifics: I think I used a 3/4 inch spade bit on the recycling bins (our town uses 3 gallon buckets for recyclables), one hole dead center; and a 3/8" or so bit several times on the bottom of the trash can. You shouldn't be impacting the structural integrity of the can if you drill 2-3 holes spaced out from each other and avoiding any seams.
Saturday, July 2, 2011
Today you may have seen me:
- Drilling holes in the bookcase beams
- Moving more gravel - I think it's just about done
- Trimming a tree
But only if you were walking down my street at the very moment I was doing those things. For the rest of you - trust me; they happened.
Sunday, June 26, 2011
More stuff
A gravel expansion of angled parking spaces next to my still technically gravel driveway continued apace today. Details and pictures soon, when it's complete. So maybe not so soon, really.
And also today, two revelations about mulberries:
1) They are delicious. I knew they were edible, and had even started looking up things one can make with them online, but hadn't actually tried real nice ripe ones until today whilst wandering around the yard talking on the phone with an old friend.
2) They stain things. I knew they stained my hands and the tarps on which they've fallen over the last few years, but I just realized that maybe they could also stain wood. This could add an interesting, very purple, twist on projects in the future.
Related - noticed that the black walnut by the driveway is bearing fruit this year, so homemade stain plans are definitely back on the agenda for fall.
And also today, two revelations about mulberries:
1) They are delicious. I knew they were edible, and had even started looking up things one can make with them online, but hadn't actually tried real nice ripe ones until today whilst wandering around the yard talking on the phone with an old friend.
2) They stain things. I knew they stained my hands and the tarps on which they've fallen over the last few years, but I just realized that maybe they could also stain wood. This could add an interesting, very purple, twist on projects in the future.
Related - noticed that the black walnut by the driveway is bearing fruit this year, so homemade stain plans are definitely back on the agenda for fall.
Thursday, September 30, 2010
Spring balances - a note of caution
If you've skimmed this blog, you know I like salvaging old building materials for new projects. Such was the case with a set of 60s era windows, still in frames, out of a house up by the lake. Disassembling the frames to free up the sashes is pretty straightforward - you just need a little patience to separate the pieces without splitting to much of the wood. The reason for this post is just a bit of fair warning about the object on the top right of the frame in this picture:


These are spring balances - one per sash - a technology still very much in use today. They are just a strap wound and spring loaded in the case, and attached about a quarter of the way down each sash:


I've seen a few of these with rubber straps, but typically they are thin, flat metal. With very sharp edges. The safest way I found to approach these is to relieve the tension on the spring - free the sash from the frame and tilt it so the strap can retract almost all the way (see next to last photo). Then and only then should you try and release it from the hook inside the sash. Wear gloves (seriously) and safety goggles (no reason not to).


These are spring balances - one per sash - a technology still very much in use today. They are just a strap wound and spring loaded in the case, and attached about a quarter of the way down each sash:


I've seen a few of these with rubber straps, but typically they are thin, flat metal. With very sharp edges. The safest way I found to approach these is to relieve the tension on the spring - free the sash from the frame and tilt it so the strap can retract almost all the way (see next to last photo). Then and only then should you try and release it from the hook inside the sash. Wear gloves (seriously) and safety goggles (no reason not to).
Tuesday, March 2, 2010
Removing old knob and tube porcelain fixtures
This isn't a post about replacing old wiring with new three strand Romex. (There will be posts on that, don't you worry your pretty little heads.) No, this is a post about a seemingly small but very poorly documented task related to such replacements - removing the knob and tube porcelain fixtures themselves. Note: The following pictures are of completely dead, orphaned wiring segments - they have not been attached to the electrical panel for decades. Never muck with live wiring, especially live knob and tube.


The nail likely extends an inch or less into the beam:
Removing knobs, then, is a fairly straightforward matter of wedging a hammer between the beam and the porcelain, and levering the nail out using the entire fixture. This next picture doesn't show how far I actually inserted the hammer - quite close to the nail:

I was a little unsure at the start of this project for fear of shattering porcelain everywhere. It doesn't seem to be an issue - the porcelain will likely chip and flake, especially as you're first working the hammer in behind the knob...
 ... but it's stronger than you might think. A gentle-but-firm approach had a half-dozen knobs out in less than ten minutes, and even an overzealous pull on one resulting in it flying from the beam and clattering to the floor didn't cause any of them to break.

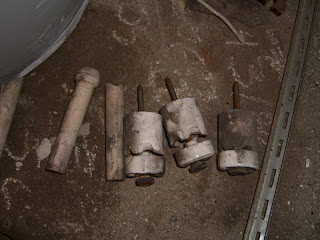
In this image you'll see both knobs - the thicker cylinders jutting out from the beam - and tubes - the thin, hollow cylinders, one of which is strung horizontally for some reason, one of which is inserted into the beam next to the first knob. Tubes are pretty easy to remove -the hole drilled for them years ago is snug but usually a bit bigger than they are. All you should have to do is slide it out - at worst, a quick yank with pliers will do you.
The knobs seem somewhat more daunting. They don't unscrew or come apart on their own. Each should consist of two porcelain segments, one thicker than the other, and a heavy nail running through them into the beam:

The nail likely extends an inch or less into the beam:

Removing knobs, then, is a fairly straightforward matter of wedging a hammer between the beam and the porcelain, and levering the nail out using the entire fixture. This next picture doesn't show how far I actually inserted the hammer - quite close to the nail:

I was a little unsure at the start of this project for fear of shattering porcelain everywhere. It doesn't seem to be an issue - the porcelain will likely chip and flake, especially as you're first working the hammer in behind the knob...

Tuesday, January 19, 2010
...and then I hotwired my house.
New high tech boilers? Insulate all the walls of the house? Sure, these things will help reduce energy usage. But in an old house like mine, one with partial infrastructure upgrades, most a few decades old, there's a smart, simple place to start - the thermostat.

The old thermostat, likely installed in the 80s or earlier.
Old mercury-based thermostats are typically less accurate than modern digital systems - their temperature reading alone can be off by four or more degrees. Plus a new programmable thermostat comes with all sorts of fancy ways to make your life easier with just a push of a button etc etc end rampant advertising here.
If you're upgrading to a new thermostat on an older heating system - and especially if your thermostat looks like the one in the picture above - you might run into some of the same issues I did. The instructions on the Honeywell model RTH6300B I picked up (note - they'll probably fix it soon, but the Lowes' website shows a previous price of $100K on the thermostat, discounted all the way to $49. Quite the deal, I know...) were pretty straightforward, and I won't take you through all the step-by-steps. I'll just annotate where things weren't as simple as advertised.
The main problem was figuring out the wire labels. The instructions assumed that your old thermostat had a label at each terminal - when you unhook the wire from the old setup, you just make a note of the letter and then attach as appropriate to the new thermostat. Suffice to say, no such labels existed on the old thermostat:

Thus some detective work was now in order. Those of you who know me know that the preceding sentence was met with some amount of glee. Anyhoo - first I did a quick check online for the old thermostat's manual (paperwork for many old systems, appliances, and tools can be found from the manufacturer, or at specialty websites). Unsurprisingly this didn't have the answer - it showed generic hookup plans for multiple types of heating systems. Time to head to the basement...


With the power already off, it was a simple(ish) matter of unscrewing the terminals where the red and white wires (from the bundle on the top left) ran. Some of the terminal labels were easy to see:

Most, including the two I cared about, were not:


After some poking and moving, I found what I needed. Except it wasn't at all what I needed. The boiler control might have had letters on it that matched expected letters for wiring up environmental controls and thermostats in this day and age, but they turned out to mean nothing. I dutifully attached wires G and Y to their appropriate terminals, plugged the thermostat faceplate back in, programmed it, and sat back on my couch... the thermostat then failed to talk to the boiler, even though everything else was working fine.
Quick sidebar explaining the title of this post: Honeywell technical support was closed by the time I tried to call them so I was sitting in a slowly cooling house. Pieces of the old thermostat had come loose when I was removing it, and I wasn't sure if I could successfully put it back together. Soon after I'd posted online griping about the problem I got a call from a high school friend who had dealt with a similar issue on an old heating system. To test to make sure that everything was still working beyond the thermostat, he had me hold the two wires together (the voltage is stepped down from 120 thanks to a transformer on or near the boiler) to complete the circuit and see if the boiler came on. It did, and we were back to musing about possible fixes. Meanwhile, though, I looped the two wires together so they would stay connected - and keep my heat on. My friend on the phone is a firefighter and he assured me this was perfectly safe - at the same time, you follow in my footsteps at your own risk; hotwiring houses is not on a list of great solutions. It's barely on a list of temporary ones.

In any case, when I did get Honeywell on the phone it was a quick conversation. The wire labels I had were useless - Y was for compressors, I think - but the phone rep had the correct info in front of him. If you're dealing with a boiler control that looks like the one in these pictures, you may want to call the thermostat manufacturer at the outset and see what terminals should be used for an old 2-wire basic I/O system. Might save some time, might not.
Everything else proceeded pretty much as the instructions said. One reminder - if you're dealing with old plaster walls like these, even if you're only making minor changes, it's best to wear a mask or, better yet, a respirator. Drilling the two screw holes to mount the unit will kick up a little dust, not to mention you don't know what will be knocked loose when you remove the old mounting plate, jerk the wires around, etc, etc, etc.

All plugged in an programmed!
Two minor quibbles with this model - First, the instructions call for using a 7/32" drill bit to make the holes on a plaster wall for the wall anchors; this is too large - the anchors slide right in with very little tension. I'll have to redrill smaller holes and reset the mounting plate tomorrow. Second, the mounting plate doesn't have fins or bumps from the back to make it more flush with the wall. As a result, you get a very slight rocking when you press the control buttons - not a big deal by any stretch, but I wish they'd thought about this given that they included wall anchors as part of the installation and could easily have balanced that slight depth with equivalent bumps on the bracket.

Oooo. It even has backlight...

As always, there are really no small jobs on an old house.
Sunday, November 22, 2009
So much for that schedule...
The blog-updating one, not the house-working-on one. Apparently I didn't make a single post while on vacation (surprise, surprise), so I'll have to catch up ... some other time. Meanwhile, let's get the typing started again with, if nothing else, a not-very-elucidating list of things I did around the house today.
- husked the last of the walnuts
- raked the last of the leaves from the front and side yards
- plugged the couple of carpenter bee holes from last summer with that savior of old houses, Abatron
- created more tool hooks in the back room
More stuff later, as always.
- husked the last of the walnuts
- raked the last of the leaves from the front and side yards
- plugged the couple of carpenter bee holes from last summer with that savior of old houses, Abatron
- created more tool hooks in the back room
More stuff later, as always.
Monday, September 7, 2009
Shelve it
The good news is I'm doing things around the house. The bad news is I'm doing many things around the house (as well as client work, the very start of ObieGame planning, and a campaign) so updates will probably be horribly behind going forward.
Yes, that made sense.
Here's a project from the other week that, of course, was more involved than I expected. The newer cabinetry in the kitchen included a microwave shelf - handy, but it made the counter space in that area feel too cramped. I decided to pull it and put in a simple open shelf in its place.
 Taking it down was a little tricky. The shelf, and the cabinet above it, were screwed into a stud on one side, but didn't line up with one on the other. They were mounted, as you do, by sandwiching screws with heads coming out the back of the units between two pieces of 3/4" particle board screwed to the studs and into the wall with plastic anchors. I should have taken a picture for you, but the short of it was to get to this point:
 ... took half an hour so the wall wasn't damaged more than it needed to be. Some spackle in the screw holes and in scraped areas, a cover plate for the outlet I decided to remove, and we're in good shape.
Oh, the outlet - it's on the same circuit as the pair below, and it was real easy to deal with. Turn off the breaker, remove the faceplate, pull the outlet out of the box, unhook all wires - there will be many more than you'd expect since it's in series - and simply attach all wires of the same color to each other (all blacks together, all grounds together, all whites together) making sure they're capped and taped so the only exposed wire in the box is the ground (which should be pigtailed to the box still). Push the bundles back into the box and you're done.
 Wall painted (thanks to Mike for hauling reclaimed remainders of a variety of useful products down from Michigan; I love freecycling) a nice plain white. The shelf supports are actually from my local garden supply store - the simple design stood out last summer when I wanted to install another simple shelf in the kitchen (see bottom of this entry). Both had to be mounted using plastic anchors into the drywall - this is one of the redone walls of the house so it has drywall over insulation as opposed to the heavy plaster and lathe elsewhere.
 The shelf is reclaimed pine from what looks like it was a shed shelf many years ago (there was a finish applied that had weathered in much the same way your wooden school desk might have looked, and faded bracket mount prints on one face). A half hour out back with the random orbit sander, and this thing looks pretty good, if I do say so myself. I may stain it at some point (installation involved one screw per support, so it's pretty easy to take apart if need be).
No more parentheses. Here's it's sibling from last summer:

Yes, that made sense.
Here's a project from the other week that, of course, was more involved than I expected. The newer cabinetry in the kitchen included a microwave shelf - handy, but it made the counter space in that area feel too cramped. I decided to pull it and put in a simple open shelf in its place.
 Taking it down was a little tricky. The shelf, and the cabinet above it, were screwed into a stud on one side, but didn't line up with one on the other. They were mounted, as you do, by sandwiching screws with heads coming out the back of the units between two pieces of 3/4" particle board screwed to the studs and into the wall with plastic anchors. I should have taken a picture for you, but the short of it was to get to this point:
 ... took half an hour so the wall wasn't damaged more than it needed to be. Some spackle in the screw holes and in scraped areas, a cover plate for the outlet I decided to remove, and we're in good shape.
Oh, the outlet - it's on the same circuit as the pair below, and it was real easy to deal with. Turn off the breaker, remove the faceplate, pull the outlet out of the box, unhook all wires - there will be many more than you'd expect since it's in series - and simply attach all wires of the same color to each other (all blacks together, all grounds together, all whites together) making sure they're capped and taped so the only exposed wire in the box is the ground (which should be pigtailed to the box still). Push the bundles back into the box and you're done.
 Wall painted (thanks to Mike for hauling reclaimed remainders of a variety of useful products down from Michigan; I love freecycling) a nice plain white. The shelf supports are actually from my local garden supply store - the simple design stood out last summer when I wanted to install another simple shelf in the kitchen (see bottom of this entry). Both had to be mounted using plastic anchors into the drywall - this is one of the redone walls of the house so it has drywall over insulation as opposed to the heavy plaster and lathe elsewhere.
 The shelf is reclaimed pine from what looks like it was a shed shelf many years ago (there was a finish applied that had weathered in much the same way your wooden school desk might have looked, and faded bracket mount prints on one face). A half hour out back with the random orbit sander, and this thing looks pretty good, if I do say so myself. I may stain it at some point (installation involved one screw per support, so it's pretty easy to take apart if need be).
No more parentheses. Here's it's sibling from last summer:

Subscribe to:
Posts (Atom)