This is quite an old post, but I finally remembered to take a picture of the finished project. Old house, old doors, old door latch mechanisms - and plenty of neglect by tenants over the years. Screws had stripped out so the knob and latch on my bedroom door was barely held in place anymore:
Attempts to fix it over the years look to mostly have involved larger and larger screws, which just gouged the wood more each time the door banged closed:
This was another fairly quick repair, thanks again to Abatron's wood epoxy (putty) which I can't recommend enough for these sorts of small replacement jobs. Side note: This is the second time I've linked to Abatron in this blog and both times I've linked to the Wood Epox directly; they also make a sister product called Liquid Wood which helps harden soft or rotted wood, and is recommended for use on the area where you'll apply Wood Epox. Just so you don't feel I've led you astray, consider buying both products at the same time - I often use both, but sometimes, frankly, I'm lazy.
Now it was just a matter of fitting all of these pieces back together correctly:
...with one small stop to the workroom. The back of the warded lock block had broken years before, and someone had attempted a fix with duct tape:
This was a more crucial part of the repair than it might immediately seem. Without a full, strong back 'wall' to this block, the whole internal mechanism could shift just far enough back and into the block that the latch wouldn't always spring free and catch in the door jam. This, too was easy enough to deal with - some Goo-Gone to clean up the surfaces, a quick filing job to make sure the broken piece fit snugly back onto the block, and a bit of SuperGlue to hold it in place. Yup, SuperGlue works just fine on these old metals:
Reassemble everything, and sink a few new screws into the rebuilt 'wood'. Voila! Working door knob:
Tuesday, March 16, 2010
Tuesday, March 2, 2010
Removing old knob and tube porcelain fixtures
This isn't a post about replacing old wiring with new three strand Romex. (There will be posts on that, don't you worry your pretty little heads.) No, this is a post about a seemingly small but very poorly documented task related to such replacements - removing the knob and tube porcelain fixtures themselves. Note: The following pictures are of completely dead, orphaned wiring segments - they have not been attached to the electrical panel for decades. Never muck with live wiring, especially live knob and tube.
The nail likely extends an inch or less into the beam:
Removing knobs, then, is a fairly straightforward matter of wedging a hammer between the beam and the porcelain, and levering the nail out using the entire fixture. This next picture doesn't show how far I actually inserted the hammer - quite close to the nail:
I was a little unsure at the start of this project for fear of shattering porcelain everywhere. It doesn't seem to be an issue - the porcelain will likely chip and flake, especially as you're first working the hammer in behind the knob...
... but it's stronger than you might think. A gentle-but-firm approach had a half-dozen knobs out in less than ten minutes, and even an overzealous pull on one resulting in it flying from the beam and clattering to the floor didn't cause any of them to break.
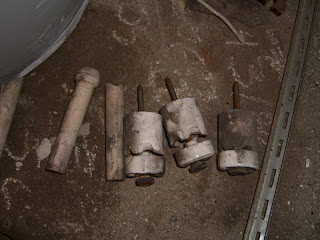
In this image you'll see both knobs - the thicker cylinders jutting out from the beam - and tubes - the thin, hollow cylinders, one of which is strung horizontally for some reason, one of which is inserted into the beam next to the first knob. Tubes are pretty easy to remove -the hole drilled for them years ago is snug but usually a bit bigger than they are. All you should have to do is slide it out - at worst, a quick yank with pliers will do you.
The knobs seem somewhat more daunting. They don't unscrew or come apart on their own. Each should consist of two porcelain segments, one thicker than the other, and a heavy nail running through them into the beam:
The nail likely extends an inch or less into the beam:
Removing knobs, then, is a fairly straightforward matter of wedging a hammer between the beam and the porcelain, and levering the nail out using the entire fixture. This next picture doesn't show how far I actually inserted the hammer - quite close to the nail:
I was a little unsure at the start of this project for fear of shattering porcelain everywhere. It doesn't seem to be an issue - the porcelain will likely chip and flake, especially as you're first working the hammer in behind the knob...
... but it's stronger than you might think. A gentle-but-firm approach had a half-dozen knobs out in less than ten minutes, and even an overzealous pull on one resulting in it flying from the beam and clattering to the floor didn't cause any of them to break.
Subscribe to:
Posts (Atom)


